Let there be light!

This should be the third (and probably last, for now at least) post in the Tasmota series.
In part 2, I described the configuration necessary to control a single relay (inside a WiFi plug) over the network. But what about if there are multiple relays? And they support not just on and off states, but a couple hundred different states? We would have a lightbulb. I’m talking about a lightbulb.
After flashing the Tasmota firmware onto my smart plugs, I also flashed it onto the completely unbranded RGB light bulb I mentioned in part 1. This was a bit trickier, as there’s no button to initiate the reset procedure. Instead, you have to turn the lamp the bulb is socketed in on and off multiple times, waiting a few seconds with each cycle. This made it even more frustrating when tuya-convert failed the first few tries, but eventually it flashed (no light bulb pun intended) successfully.
After configuring WiFi the same way as I described for the plug setup process in part 1, I got a working web UI. But because this bulb didn’t match any of the known devices in the Tasmota documentation, I had no idea which LEDs were connected to which GPIO pins, so it was a pretty useless lightbulb. Luckily, Tasmota provides instructions for figuring this out, and after several writes and reboots, making notes along the way, I got the pins configured:
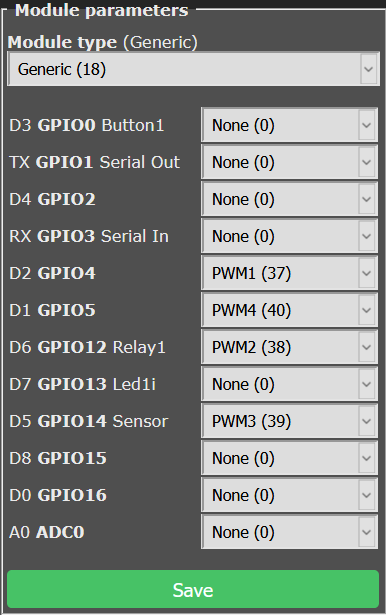
Because this RGB bulb is actually an RGBW bulb (the W indicating that it has separate white LEDs that are much brighter than the colored LEDs), it gets a little more complicated. The bulb does some pretty interesting things when the pin connected to the bright white LEDs is set to the wrong color. It uses these lights on low power to brighten other colors, so when it tries to lighten red with green, things get funky.
This process also involved running some commands to configure light options, and I really wished the web UI’s console window had a command history. Apparently I wasn’t alone because there was a Tasmota update a couple days later that added this feature.
But eventually I had a working web UI:
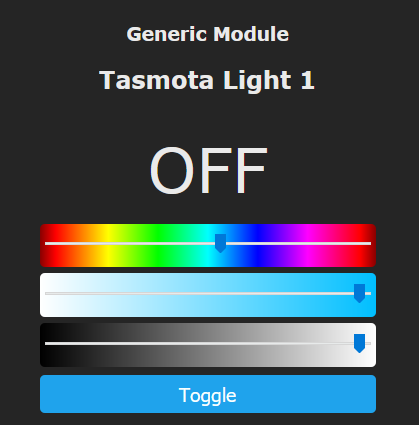
But this interface isn’t the most user-friendly thing in the world (no palette of colors to pick from?), and I didn’t want to have to navigate to its LAN IP address every time I wanted to turn the lamp on. So, I then spent the next few hours trying to figure out how to communicate with it over MQTT. I’ll save you the trouble and share my final Home Assistant configuration for it below, annotated to make things easier to understand:
light:
  - platform: mqtt
    name: "Light Name Here"

    # Where HA should send on/off commands
    command_topic: "cmnd/tasmota_light_1/POWER"

    # Where HA should listen for success/failure messages
    state_topic: "stat/tasmota_light_1/RESULT"

    # What data HA should pull from the RESULT message
    # to indicate the current on/off state
    state_value_template: "{{ value_json.POWER }}"

    # Where HA should listen for ping messages
    availability_topic: "tele/tasmota_light_1/LWT"

    # Where HA should send brightness commands
    brightness_command_topic: "cmnd/tasmota_light_1/Dimmer"

    # Where HA should listen for the current brightness
    brightness_state_topic: "tele/tasmota_light_1/STATE"

    # The maximum value for brightness
    # (some firmware uses 0-255, Tasmota uses 0-100)
    brightness_scale: 100

    # The command to use to turn on the bulb
    on_command_type: "brightness"

    # What data HA should pull from the STATE data to get the current brightness
    brightness_value_template: "{{ value_json.Dimmer }}"

    # Where HA should listen for the current brightness of the white LEDs
    white_value_state_topic: "tele/tasmota_light_1/STATE"

    # Where HA should send commands to change the brightness of the white LEDs
    white_value_command_topic: "cmnd/tasmota_light_1/White"

    # The maximum value for the white brightness
    # (some firmware uses 0-255, Tasmota uses 0-100)
    white_value_scale: 100

    # What data HA should pull from the STATE data to get
    # the current brightness of the white LEDs
    # In this case, it's the 4th channel (RGBW), which is at index 3
    white_value_template: "{{ value_json.Channel[3] }}"

    # Where HA should send commands to change the color of the bulb
    rgb_command_topic: "cmnd/tasmota_light_1/Color2"

    # Where HA should listen for changes to the color of the bulb
    rgb_state_topic: "tele/tasmota_light_1/STATE"

    # How HA should format and parse color values
    # This takes a 4-item comma-separated list like R,G,B,W and
    # removes the last item (white), returning only R,G,B
    rgb_value_template: "{{ value_json.Color.split(',')[0:3] | join(',') }}"

    # Where HA should send commands to enable lighting effects
    # (originally called "scenes" in the Tuya app)
    effect_command_topic: "cmnd/tasmota_light_1/Scheme"

    # Where HA should listen for the current effect mode
    effect_state_topic: "tele/tasmota_light_1/STATE"

    # What data HA should extract to get the effect name
    effect_value_template: "{{ value_json.Scheme }}"

    # The effect types supported by the bulb
    effect_list: [0, 1, 2, 3, 4]

    # What data HA should send/expect to mean the bulb is on
    payload_on: "ON"

    # What data HA should send/expect to mean the bulb is off
    payload_off: "OFF"

    # What data HA should expect to mean the bulb is online
    payload_available: "Online"

    # What data HA should expect to mean the bulb is offline
    payload_not_available: "Offline"

    # Deliver each message at least once, but more if necessary
    # 0 = 0-1 times (failures will be ignored...think of UDP)
    # 1 = 1+ times (resend until there is an acknowledgement)
    # 2 = 1 time (back-and-forth acknowledgement...think of TCP)
    qos: 1

    # MQTT brokers can "retain" messages and deliver them as soon as
    # a new service subscribes to a topic, before a new message is sent
    # in that topic. This tells HA not to mark its messages as retainable.
    # Doing so would mean that if HA sends a command while the bulb is
    # not listening (probably offline), the broker will keep that message,
    # and the next time the bulb connects it will receive that message, and
    # it will perform whichever action was last sent. That's not desirable if
    # the bulb goes offline, HA tells it to turn on, and then it reconnects
    # early in the morning while you're trying to sleep!
    retain: false
configuration.yaml
And now Home Assistant can control the bulb! However, I still haven’t found a good way to represent the bulb’s color abilities in the Home Assistant frontend, so I can only turn it on/off and change the brightness. But that’s fine for me, because I added it to my configuration for Google Assistant:
google_assistant:
  project_id: ...
  service_account: ...
  report_state: true
  expose_by_default: false

  entity_config:
    switch.light_name_here:
      expose: true
configuration.yaml
And now I can use the Google Home app to control it, which does offer a nice UI.
Comments ()