Receiving Unraid alerts in Home Assistant
As Discord continues to enshittify itself, I've been trying to stop using it for anything important. The last hurdle was receiving notifications from my Unraid file server.
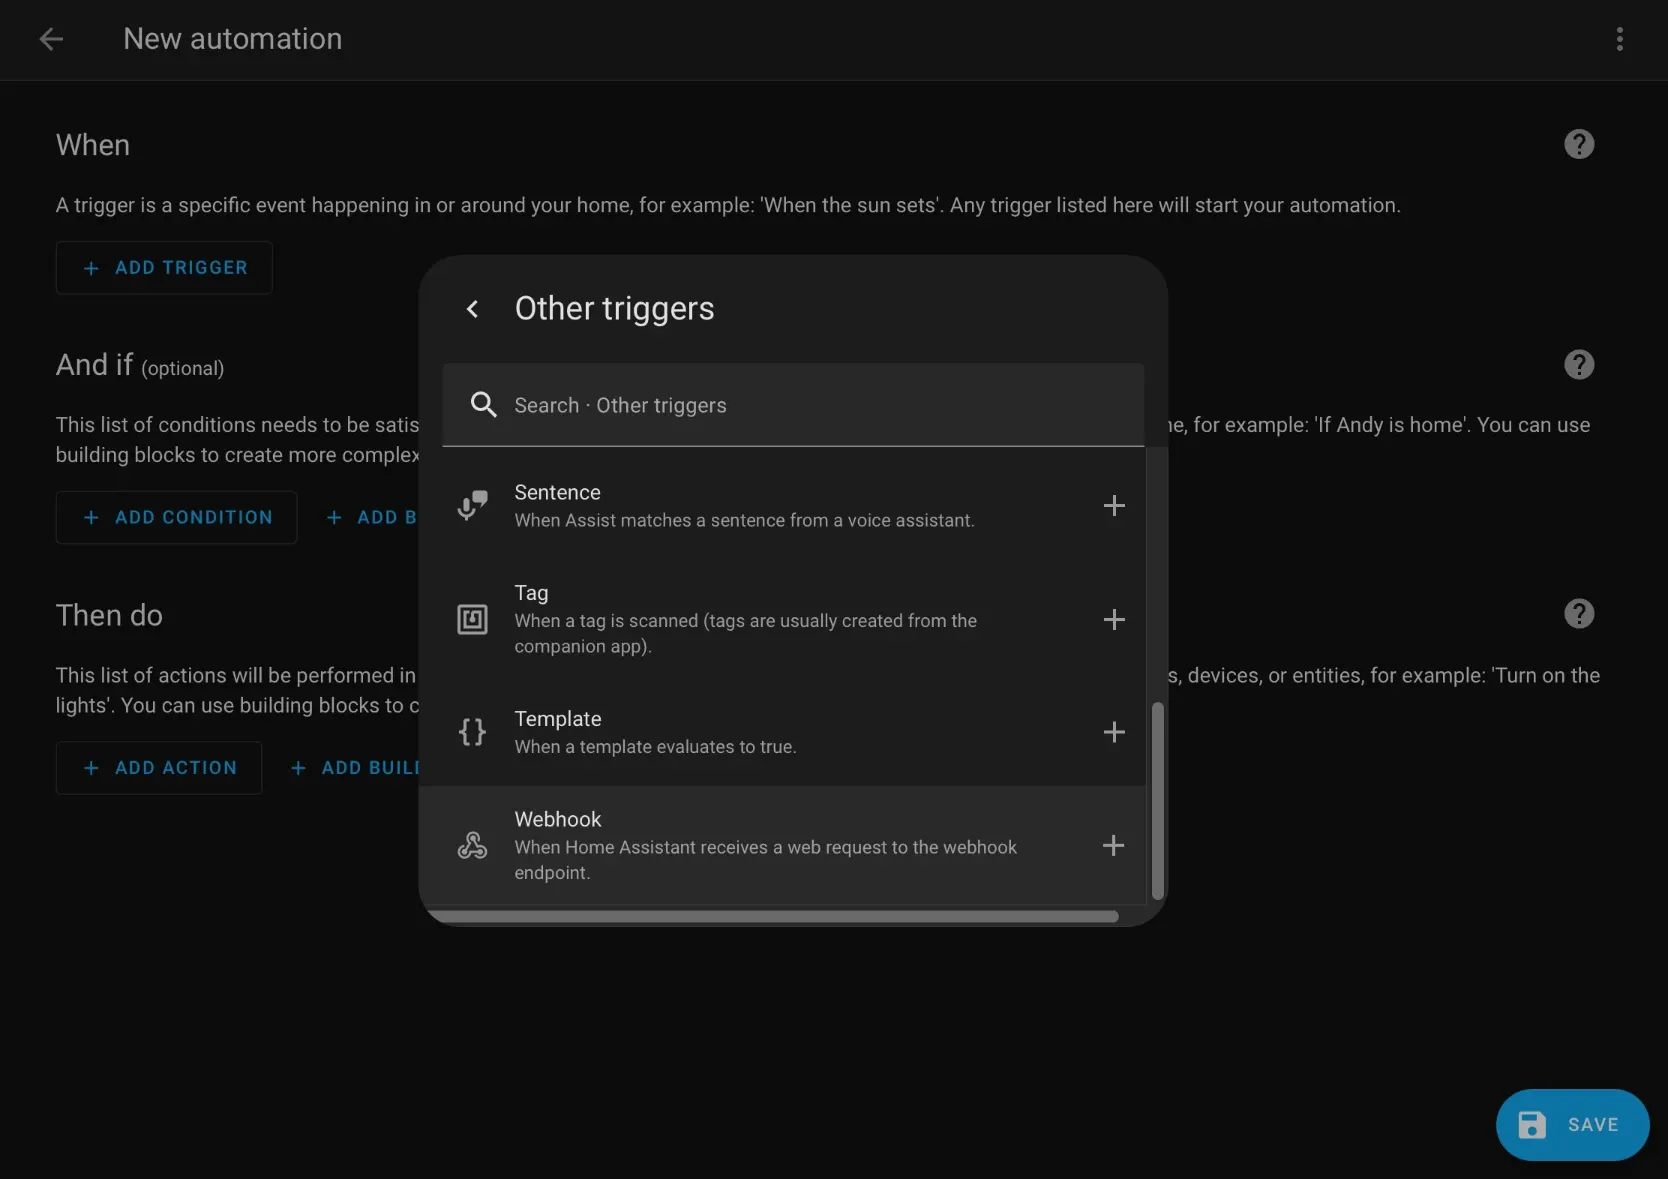
I didn’t know this until it came up in an unrelated search one day, but Home Assistant automations can be triggered by simple HTTP requests, and these requests can even provide data for the automation to use. I’ll explain the basics here, but if you got as excited by this as I did, you might want to read the full documentation as well.
When creating an automation trigger, select the “Webhook” trigger type (it’s located under “Other triggers” if you prefer scrolling and clicking to searching). Home Assistant will automatically generate a random webhook ID for security (remember, anyone with this ID can trigger this automation with whatever data they please), but you can change it if you really want to.
Handling incoming webhooks using Home Assistant automations
I didn’t know this until it came up in an unrelated search one day, but Home Assistant automations can be triggered by simple HTTP requests, and these requests can even provide data for the automation to use. I’ll explain the basics here, but if you got as excited by this as I did, you might want to read the full documentation as well.
When creating an automation trigger, select the “Webhook” trigger type (it’s located under “Other triggers” if you prefer scrolling and clicking to searching). Home Assistant will automatically generate a random webhook ID for security (remember, anyone with this ID can trigger this automation with whatever data they please), but you can change it if you really want to.
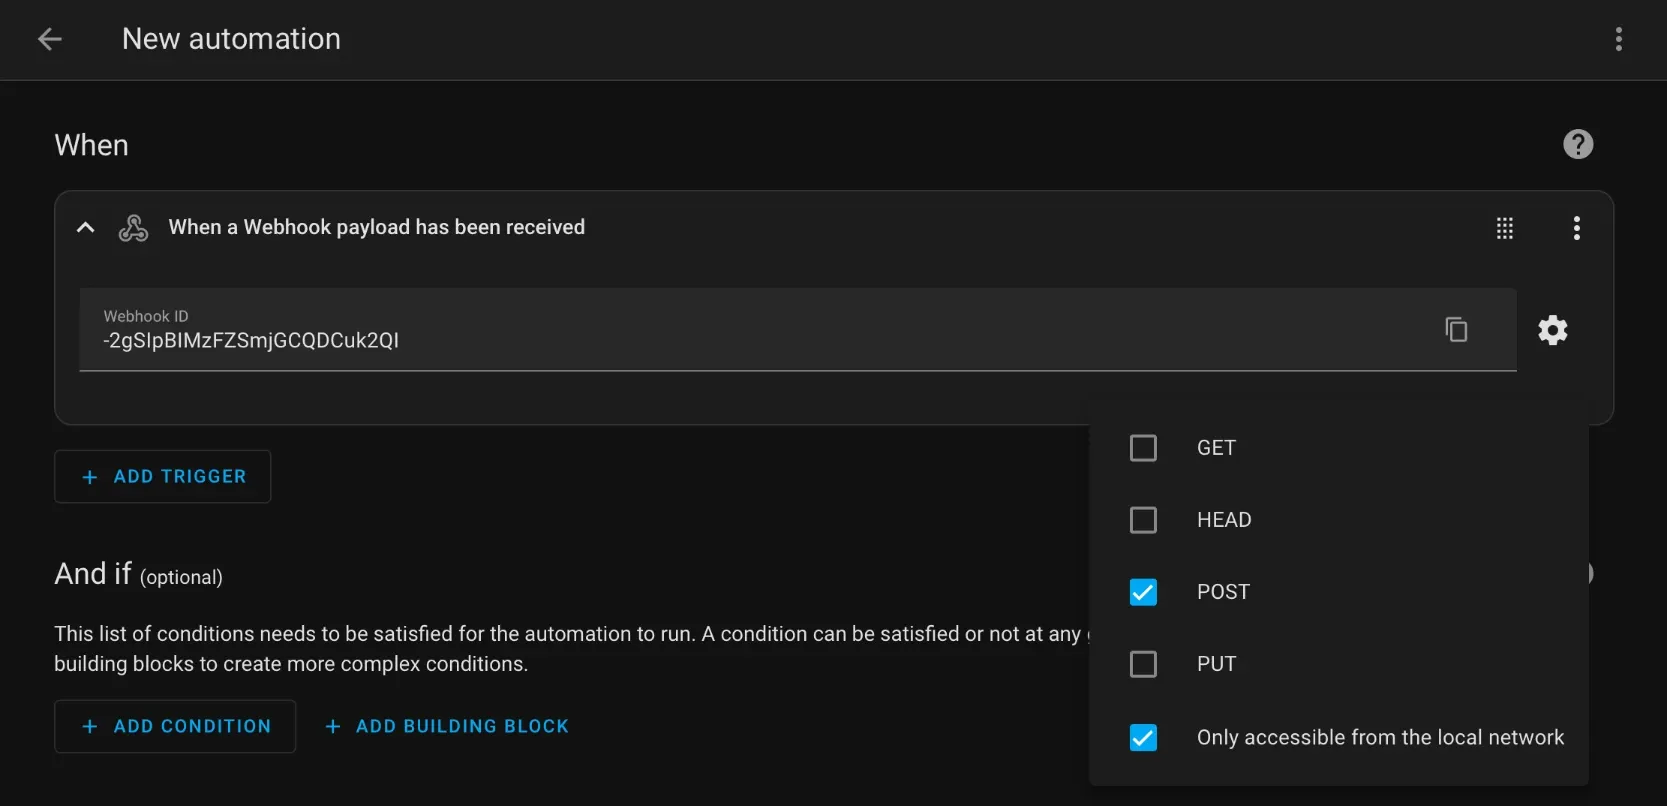
Click the “copy” button inside the webhook ID field to copy the entire URL needed to trigger the automation. For example, http://homeassistant.local:8123/api/webhook/-2gSIpBIMzFZSmjGCQDCuk2QI.
Now, save the empty automation with a descriptive name. We’ll come back and fill it in later.
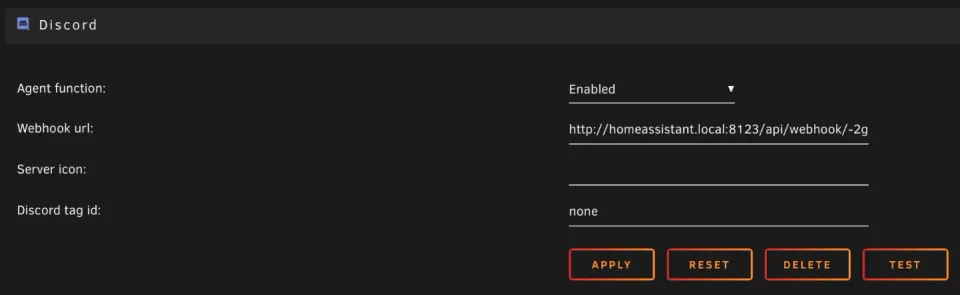
Setting up the webhook in Unraid
To enable external notifications in Unraid, go to Settings → User Preferences → Notification Settings.
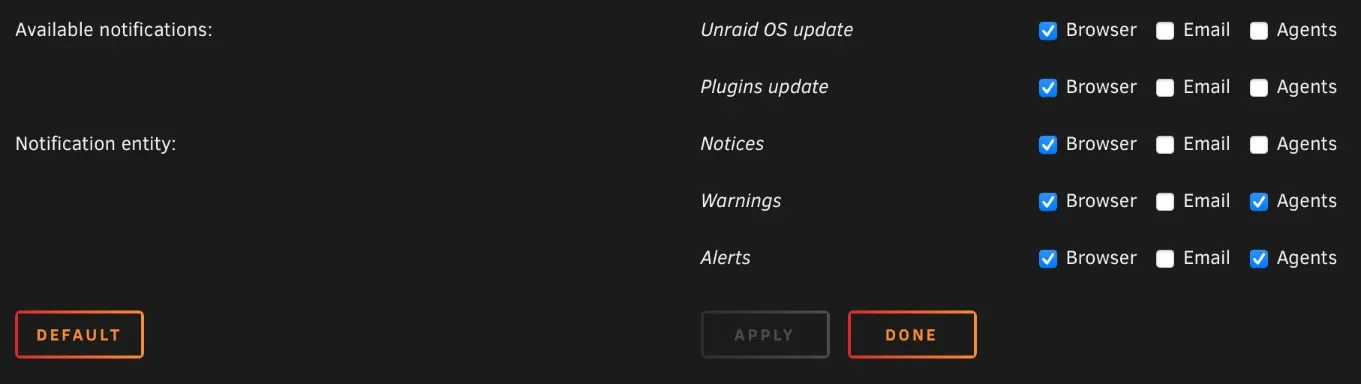
First, choose which types of notifications you’d like to receive. Once you’ve checked the boxes you want, click Apply and then scroll down to the Discord section.
To send the notifications to Home Assistant, we’ll use Unraid’s Discord notification agent. I chose it because it has a very simple configuration (just a webhook URL) and send the data in a simple JSON format.
Just because Unraid’s settings expect a Discord webhook URL doesn’t mean we have to enter a Discord webhook URL; a Home Assistant webhook URL also works just fine. Set the “Agent function” setting to Enabled and paste in the automation’s webhook trigger URL, then click Apply.
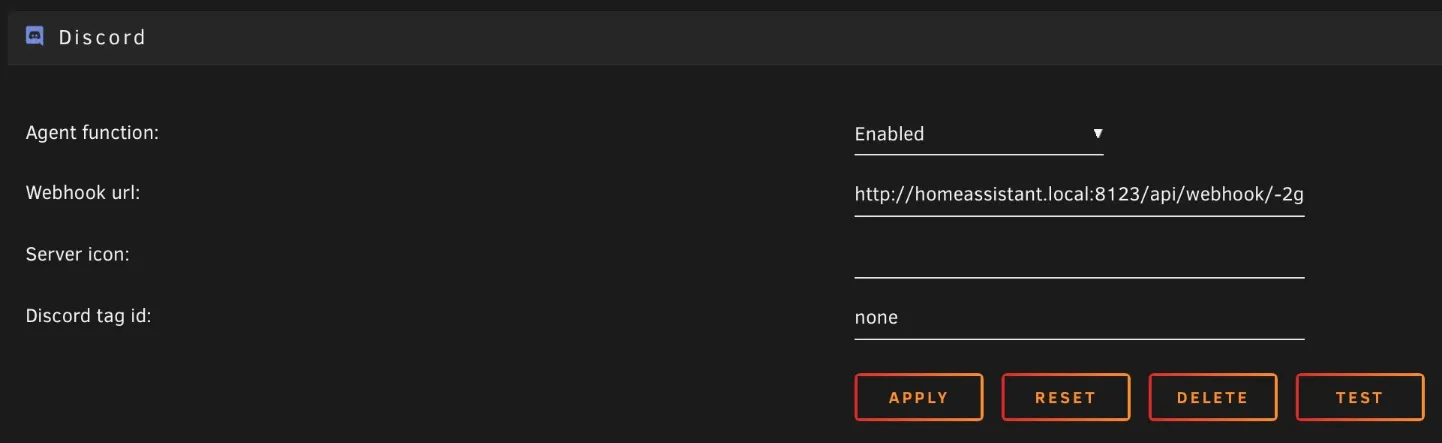
Once the page reloads, click Test and you should see your Home Assistant automation run with the test message.
Handling incoming requests in Home Assistant
Once the automation has run with a sample notification, we can use Home Assistant’s automation trace feature to see how the data is structured. This will be important for pulling specific notification fields out of it.
From the automation editor, click the Traces button at the top right to view the history of the automation’s runs. Looking at the most recent (when it received the test message from Unraid), you can see the automation flowchart on the left and details on the right. Click the trigger node (asterisk) in the left pane and then switch to the “changed variables” tab in the right pane to see the notification data that was received.
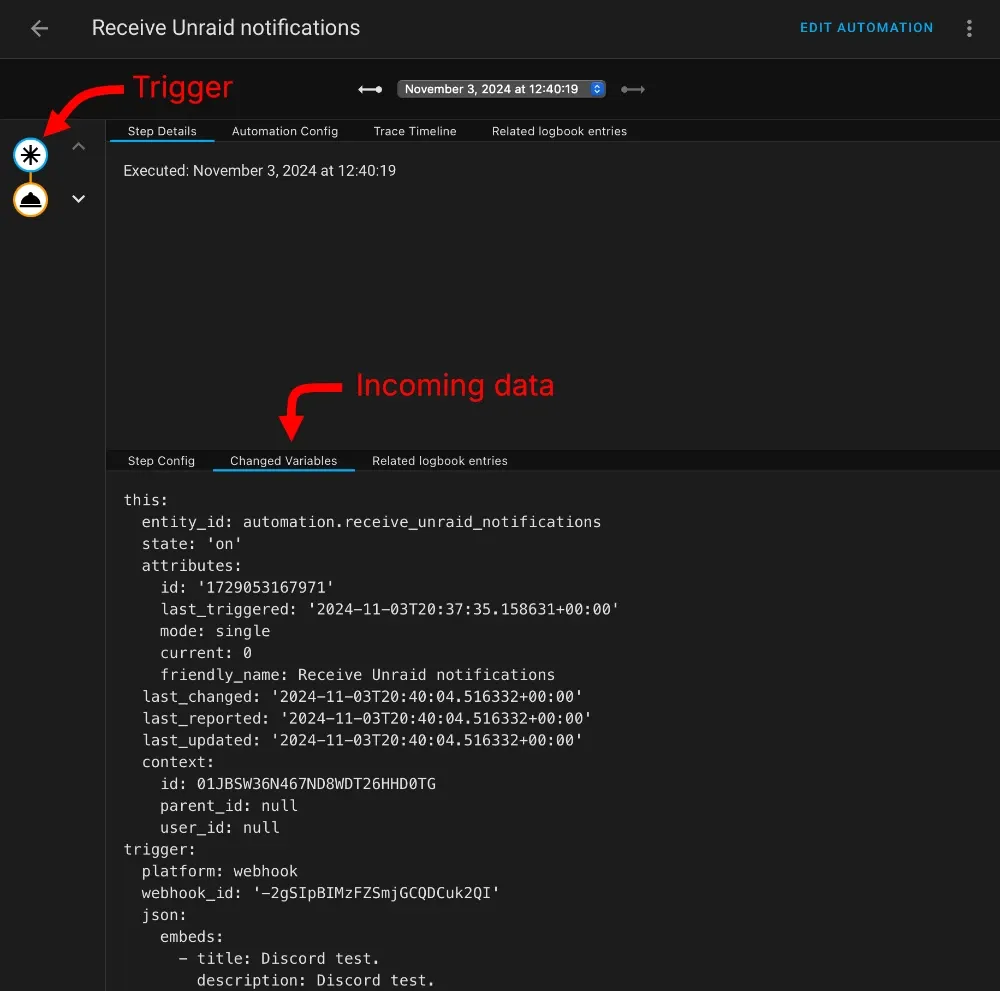
The incoming notification data is in the “trigger” property, which I’ve copied below:
trigger:
  platform: webhook
  webhook_id: '-2gSIpBIMzFZSmjGCQDCuk2QI'
  json:
    embeds:
      - title: Discord test.
        description: Discord test.
        url: http://192.168.2.125/Settings/Notifications
        timestamp: '2024-11-03T20:40:04.000Z'
        color: '39208'
        author:
          icon_url: https://craftassets.unraid.net/uploads/logos/[email protected]
          name: MEDIA-SERVER
        thumbnail:
          url: https://craftassets.unraid.net/uploads/discord/notify-normal.png
        fields:
          - name: Description
            value: Discord test.
          - name: Priority
            value: normal
            inline: true
Unraid sends its notifications as a Discord message embed, so the embeds property is an array with a single value. That value is an object with a lot of properties, but we mainly care about the title and description.
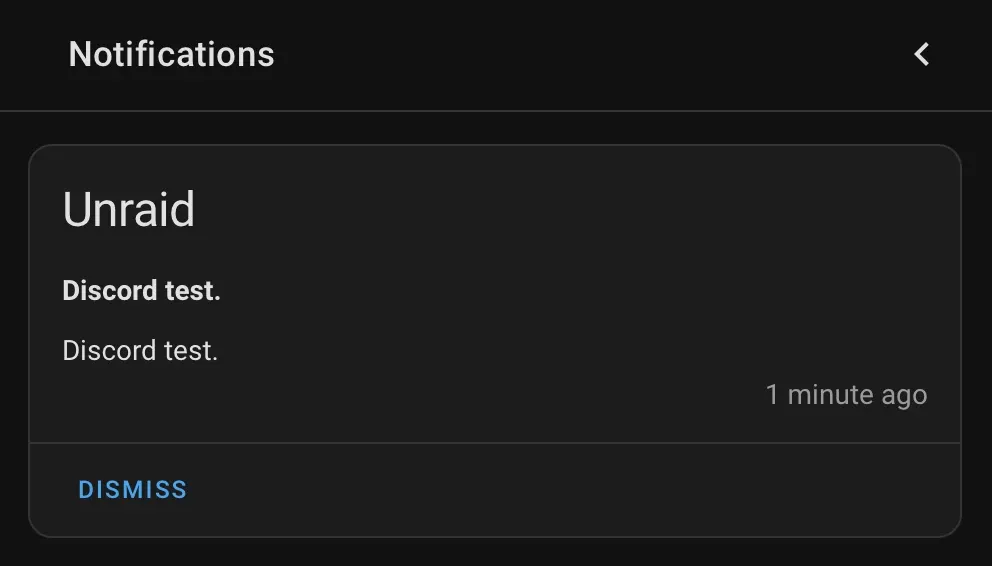
There’s a lot of places we could forward this notification. For example, we could send a push notification using the Home Assistant companion app. But I don’t deem these urgent enough to warrant my immediate attention, so I register them as persistent Home Assistant notifications that I will notice the next time I open Home Assistant.
To do this, just create an automation action with the following code:
action: persistent_notification.create
data_template:
  title: Unraid
  message: >-
    <p><b>{{ trigger.json.embeds[0].title }}</b></p>
    <p>{{ trigger.json.embeds[0].description }}</p>
Once you save the automation, click the Test button in Unraid again, and you should see this:
Comments ()